Dashboard Overview
Upon logging in, you should see a dashboard similar to the screenshot below. Please note that your view may vary slightly depending on your role and access level.
The sections below highlight the key navigation elements you will use most often:
1. Dashboard: Returns you to the main/default view at any time.
2. Tickets: Opens your ticket workspace, where you can view recent tickets.
3. Contacts: Provides access to the company and contact database.
4. Solutions: Contains knowledge base articles, SOP's, guides, and other reference materials.
5. AI Agents and Chatbots: Not currently in use.
6. Analytics: Primarily used by management for reporting, data analysis, and imports/exports.
7. Admin: Houses system settings, including workflows, automations, and support operations.
8. Freshcaller: Opens the Freshcaller application, which is our primary phone system.
9. Expand/Collapse Side Panel: Allows you to adjust your view based on your preference.
10. Freshworks Switcher: Enables quick switching between Freshdesk, Omnichannel, and the Sales Suite.
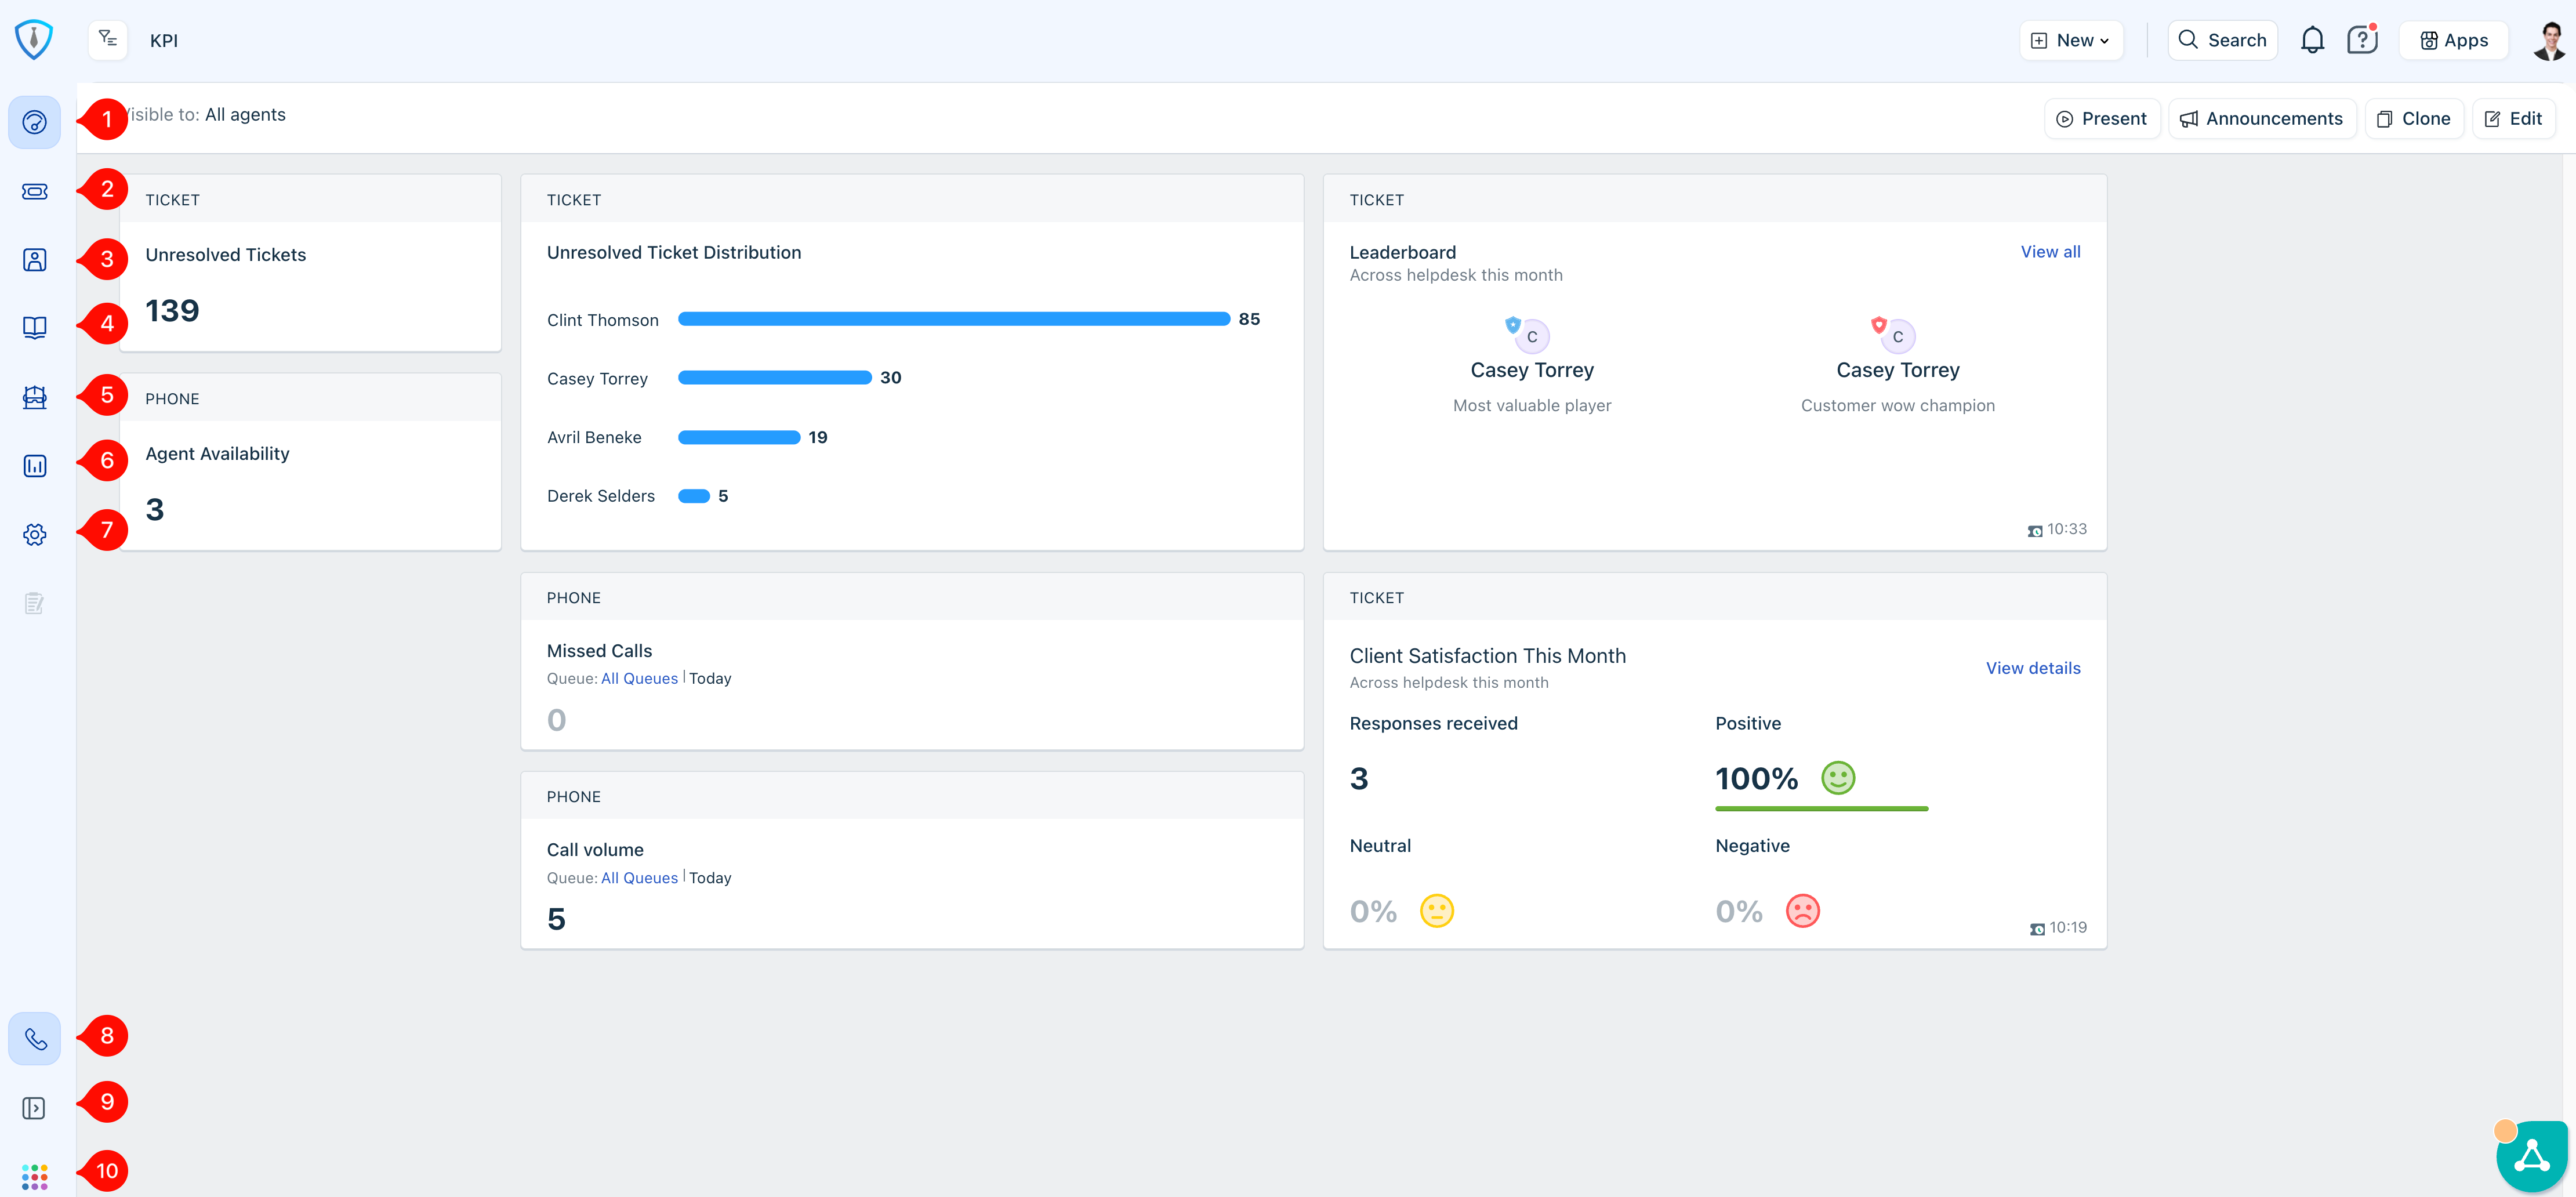
Figure 1: Overview of Default Dashboard View
Section 1: Navigating the Ticket Workspace
You can access your ticket queue by clicking the Tickets shortcut in the main dashboard navigation (Item 2 in Figure 1), or by selecting the bar next to your name within the Unresolved Ticket Distribution section (Item 1 in Figure 2).
This same method can also be used to quickly navigate to another internal user’s ticket queue by selecting the bar next to their name from the distribution view.
Note: If the Unresolved Ticket Distribution section is not visible on your dashboard, you may need to update your default portal view to KPI (Item 2, Figure 2).

Figure 2: Specific User Ticket Queue Access and Default Dashboard View Preference
Section 2: Customizing Your Default Ticket View
You are responsible for all tickets assigned to you, so it is important to configure your default view in a way that keeps your queue clear and easy to manage. It is recommended to match the settings shown in Figure 3 so that your view highlights the most relevant and actionable tickets.
To begin, click Item 1 in Figure 3 to open the Ticket Views Panel. From there, you can select Item 2 (Edit View) if you would like to rename your Default View.
Within the view settings, set the sorting option (Item 3) to Last Modified. This ensures that the most recently updated or responded-to tickets appear at the top of your queue.
For filtering, confirm that only your name is selected under the agent field (Item 4), so you are viewing only your assigned tickets. Then, under status (Item 5), select Open as the only included status. This keeps your queue focused on active work that still requires attention.
Once these settings are configured, click the blue Apply button. A new option will then appear as shown in Figure 4, where you must click the checkmark to finalize and save the view as your default. If a checkmark does not appear, it means no changes were made to the current saved version of the view.
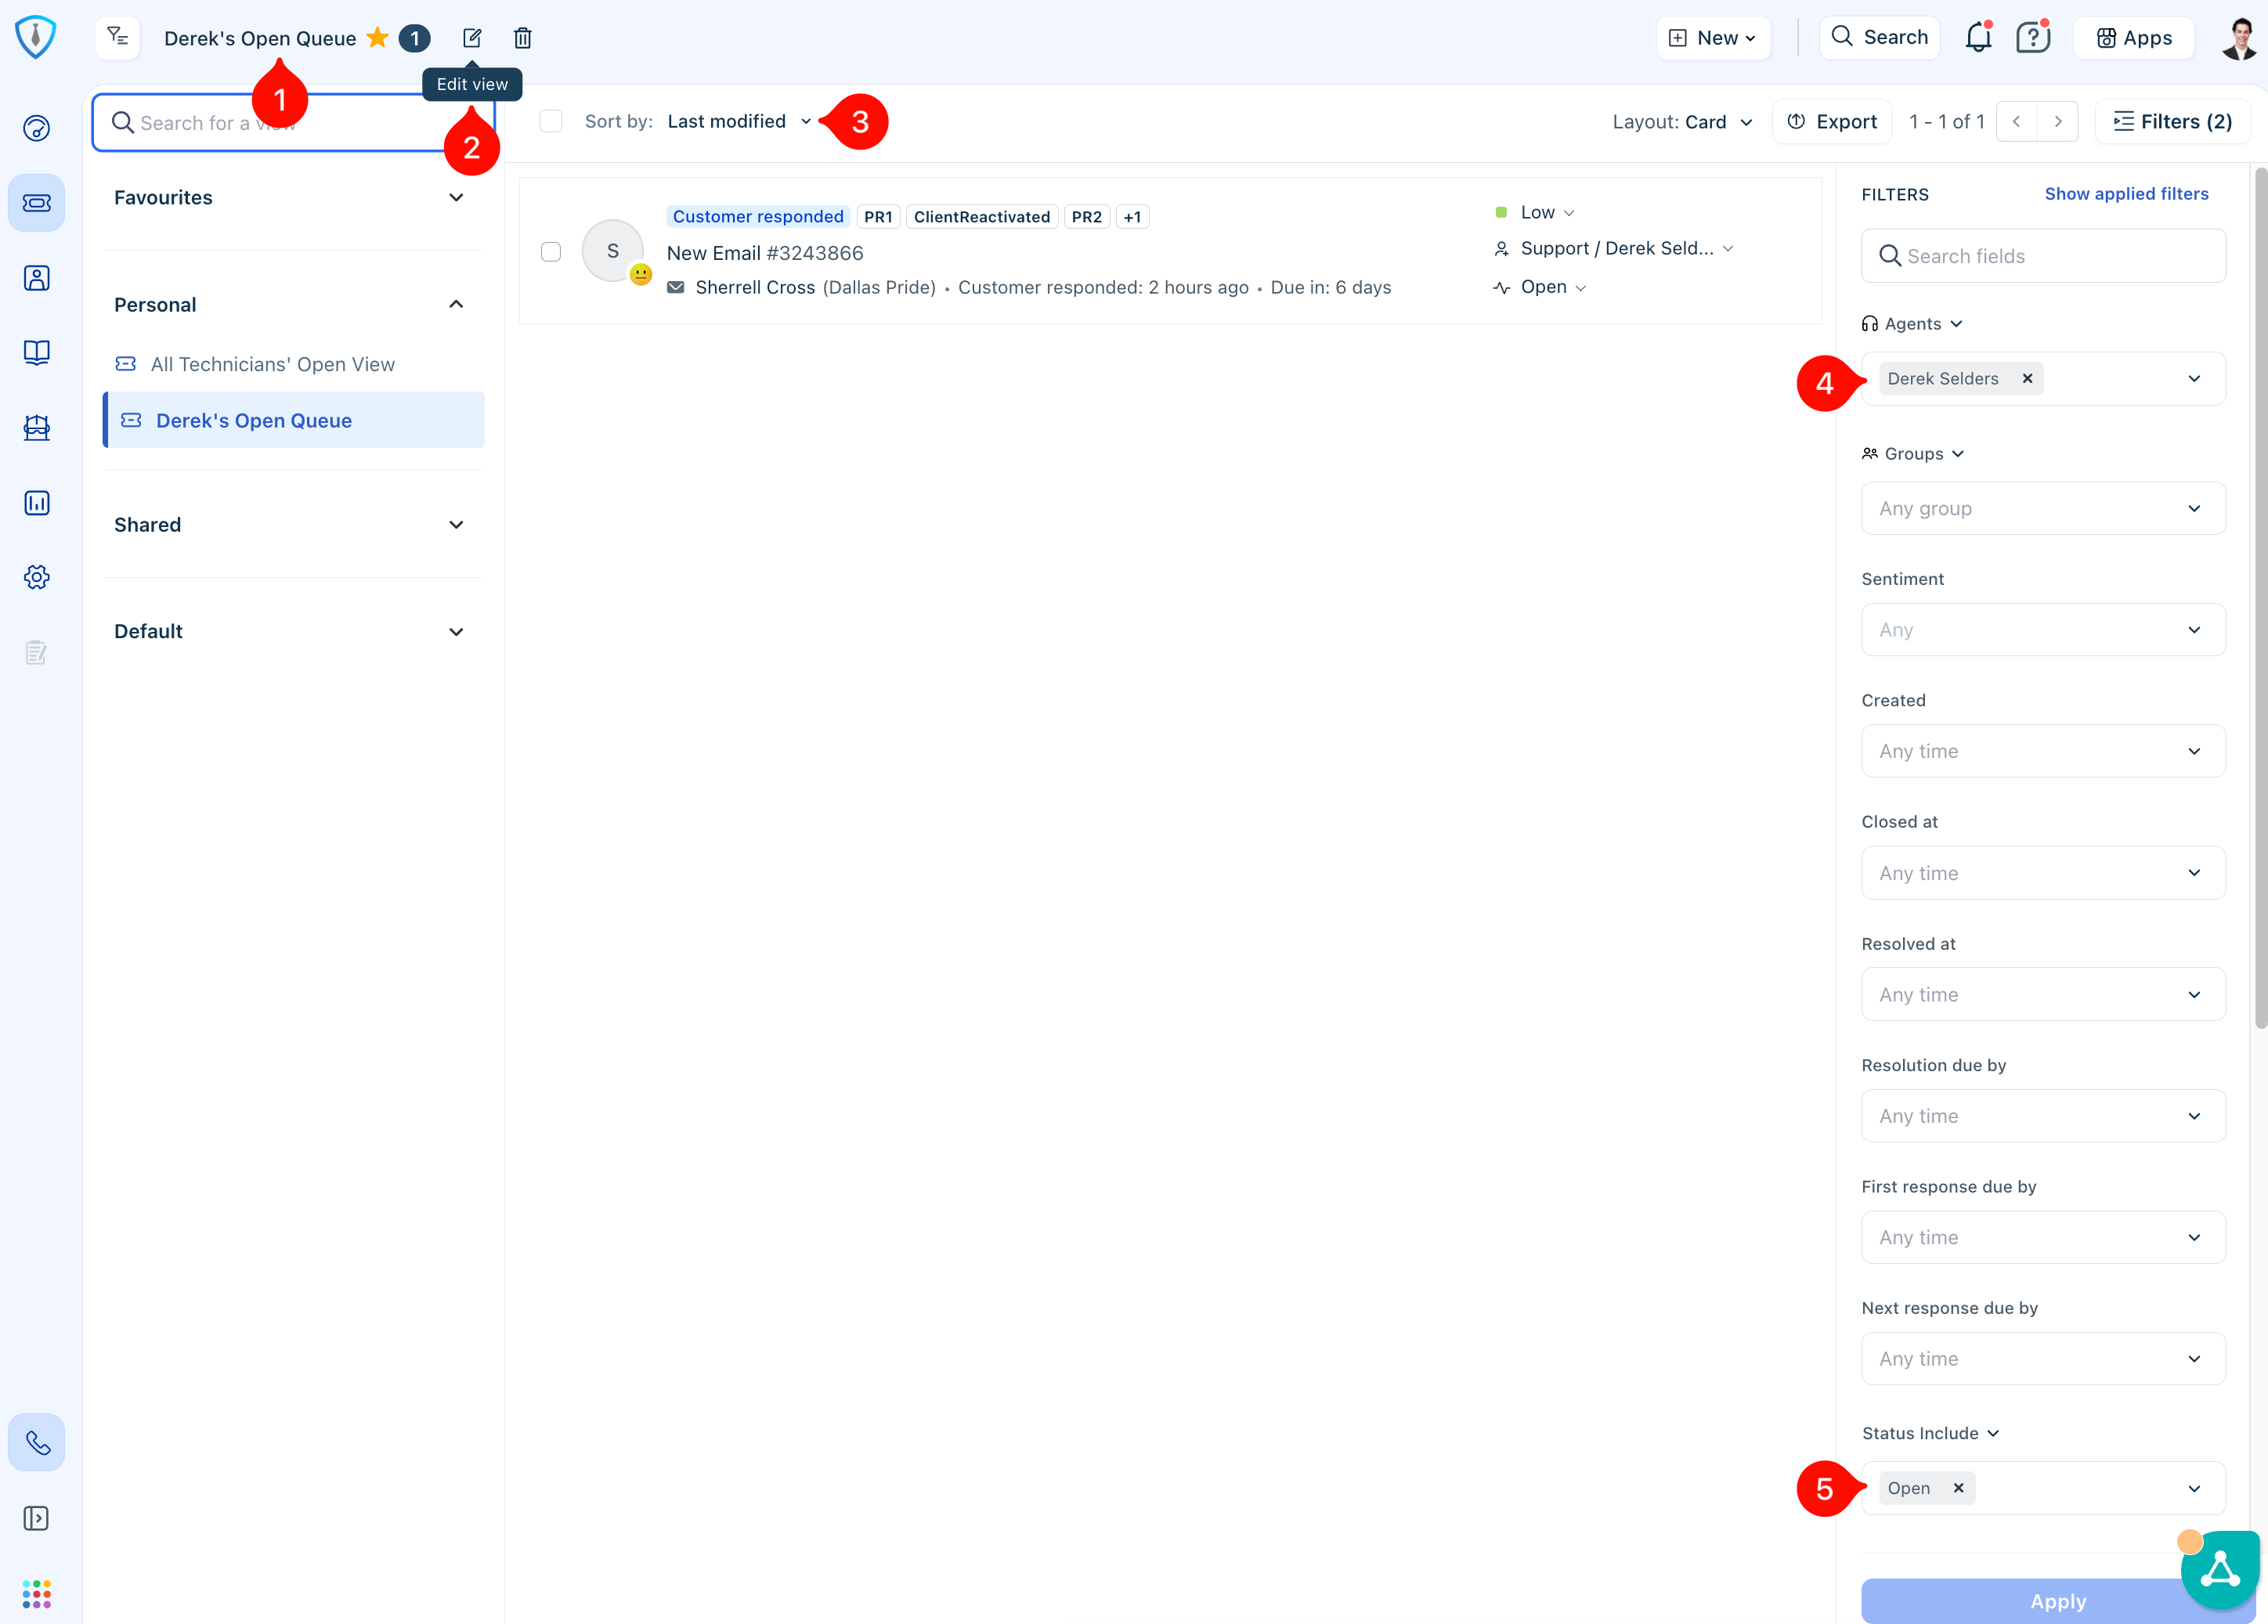
Figure 3: Recommended Settings for Your Default Ticket Queue View
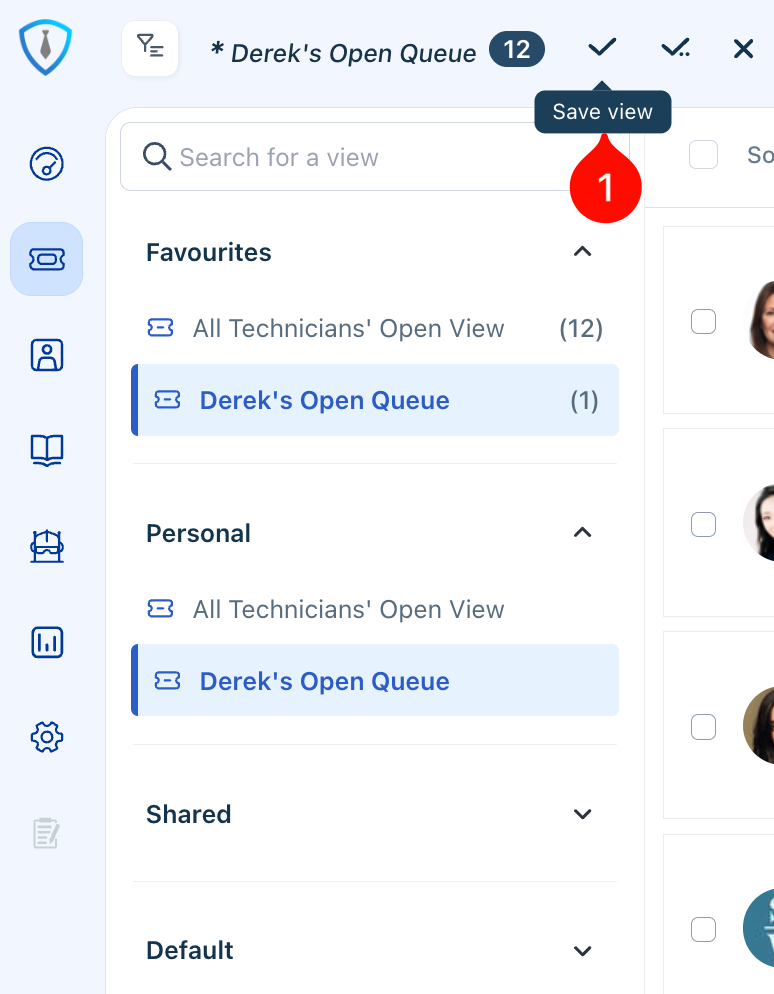
Figure 4: Save Ticket View Confirmation
You are welcome to create and save additional views based on your personal workflow preferences.
The standard expectation is that you end each workday with no open tickets remaining in your queue. You should also perform a quick review of your tickets in other unresolved statuses to ensure nothing has been overlooked before the close of business.
While management does not actively micromanage day-to-day activity, key operational alerts are in place. These include notifications for tickets awaiting an initial response, exceeding resolution targets, or remaining in a status for an extended period. When these thresholds are met, you may see internal notes from management to help bring attention back to those tickets.
Section 3: Ticket Creation and Where Tickets Come From
Before working with incoming tickets, it is important to understand how they are created and enter our system. Tickets can originate from several sources, listed below from most common to least common:
- Email is the primary source, where customers send messages to our designated support addresses, which automatically generate tickets.
- Phone calls through Freshcaller can also result in ticket creation. At the end of a call, a ticket can be logged and will include access to the call recording for reference.
- Chat messages from supported systems may create tickets if they are not picked up by an agent in real time. In these cases, the chat will automatically convert into a new ticket.
- Agents also have the ability to manually create tickets when needed, such as when documenting work performed outside of standard intake channels.
- Finally, tickets may be generated through automations and system integrations. Monitoring tools, security alerts, and other automated notifications are often routed into our support email addresses and create tickets accordingly. Most of these are configured to be automatically assigned to operations or management, though you may occasionally encounter one that requires manual review or reassignment.
When and How to Manually Create a Ticket
There are two primary methods you will use to create a manual ticket: direct entry within the ticketing system and converting a phone call into a ticket. Both methods are outlined below.
Manually Creating a Ticket
From any view within Freshdesk, you can create a new ticket by clicking New and then selecting Ticket (Items 1 and 2 in Figure 5). This will open a blank ticket form (Figure 6).
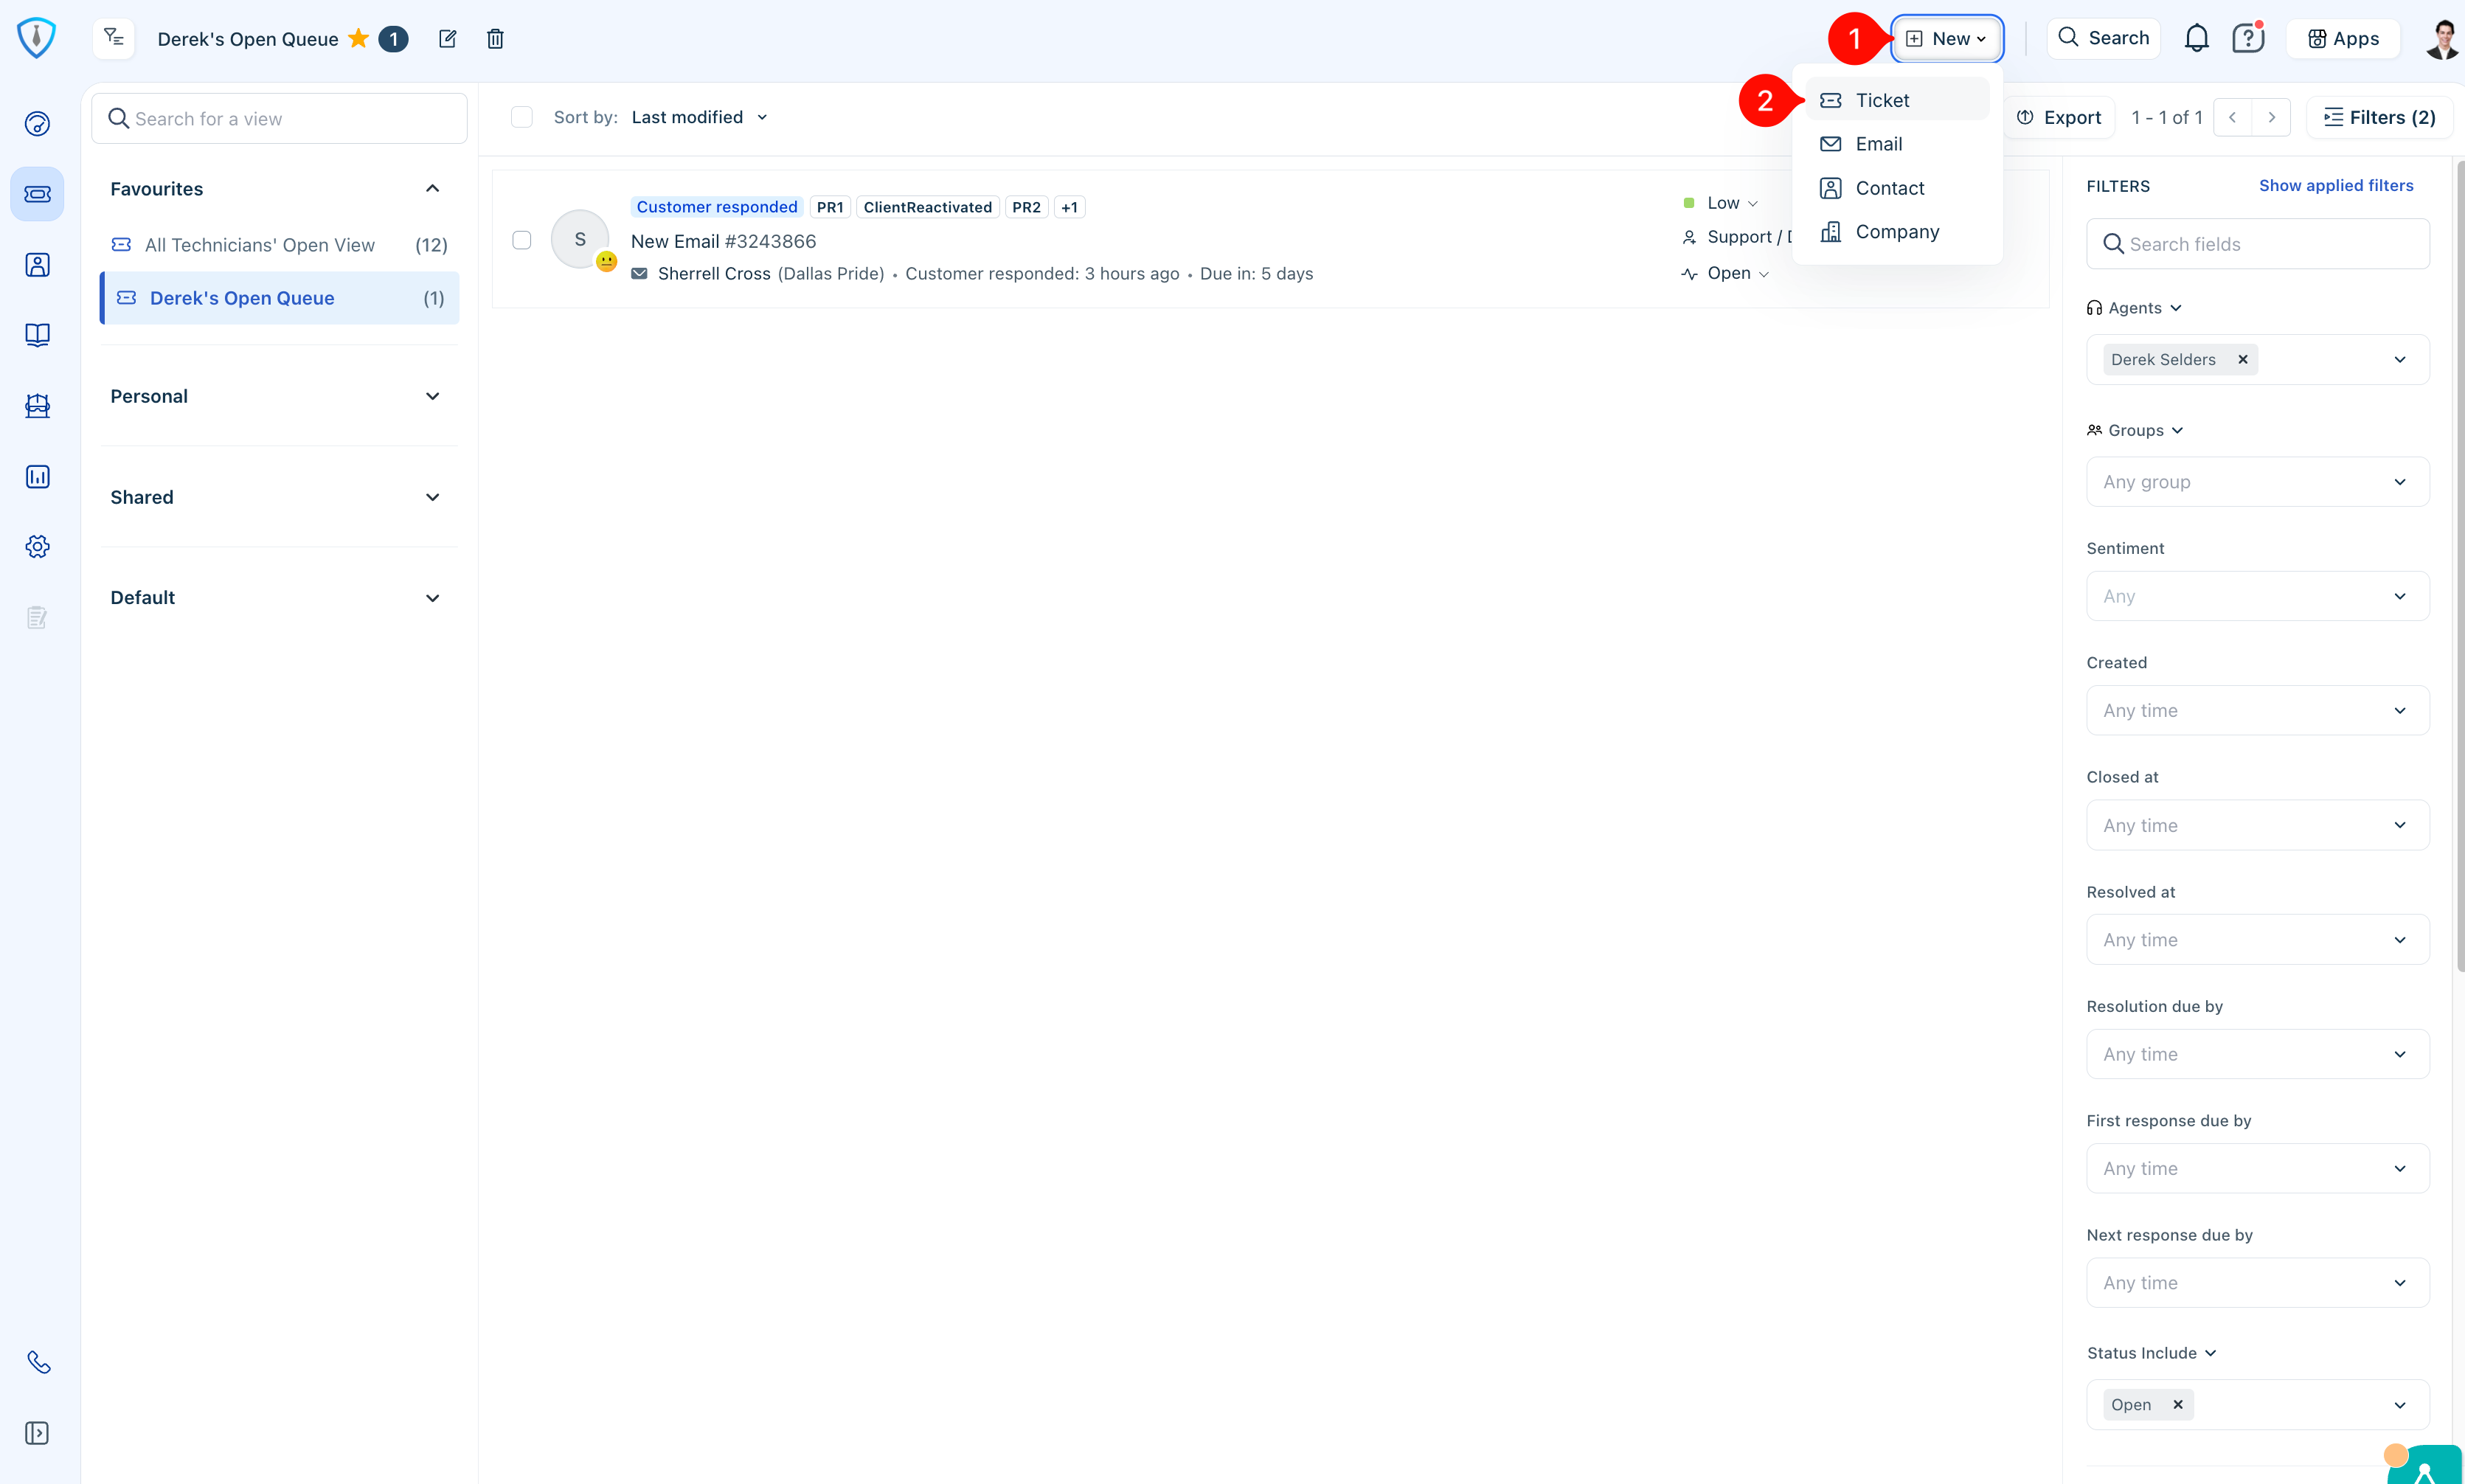
Figure 5: How to Create a New Ticket
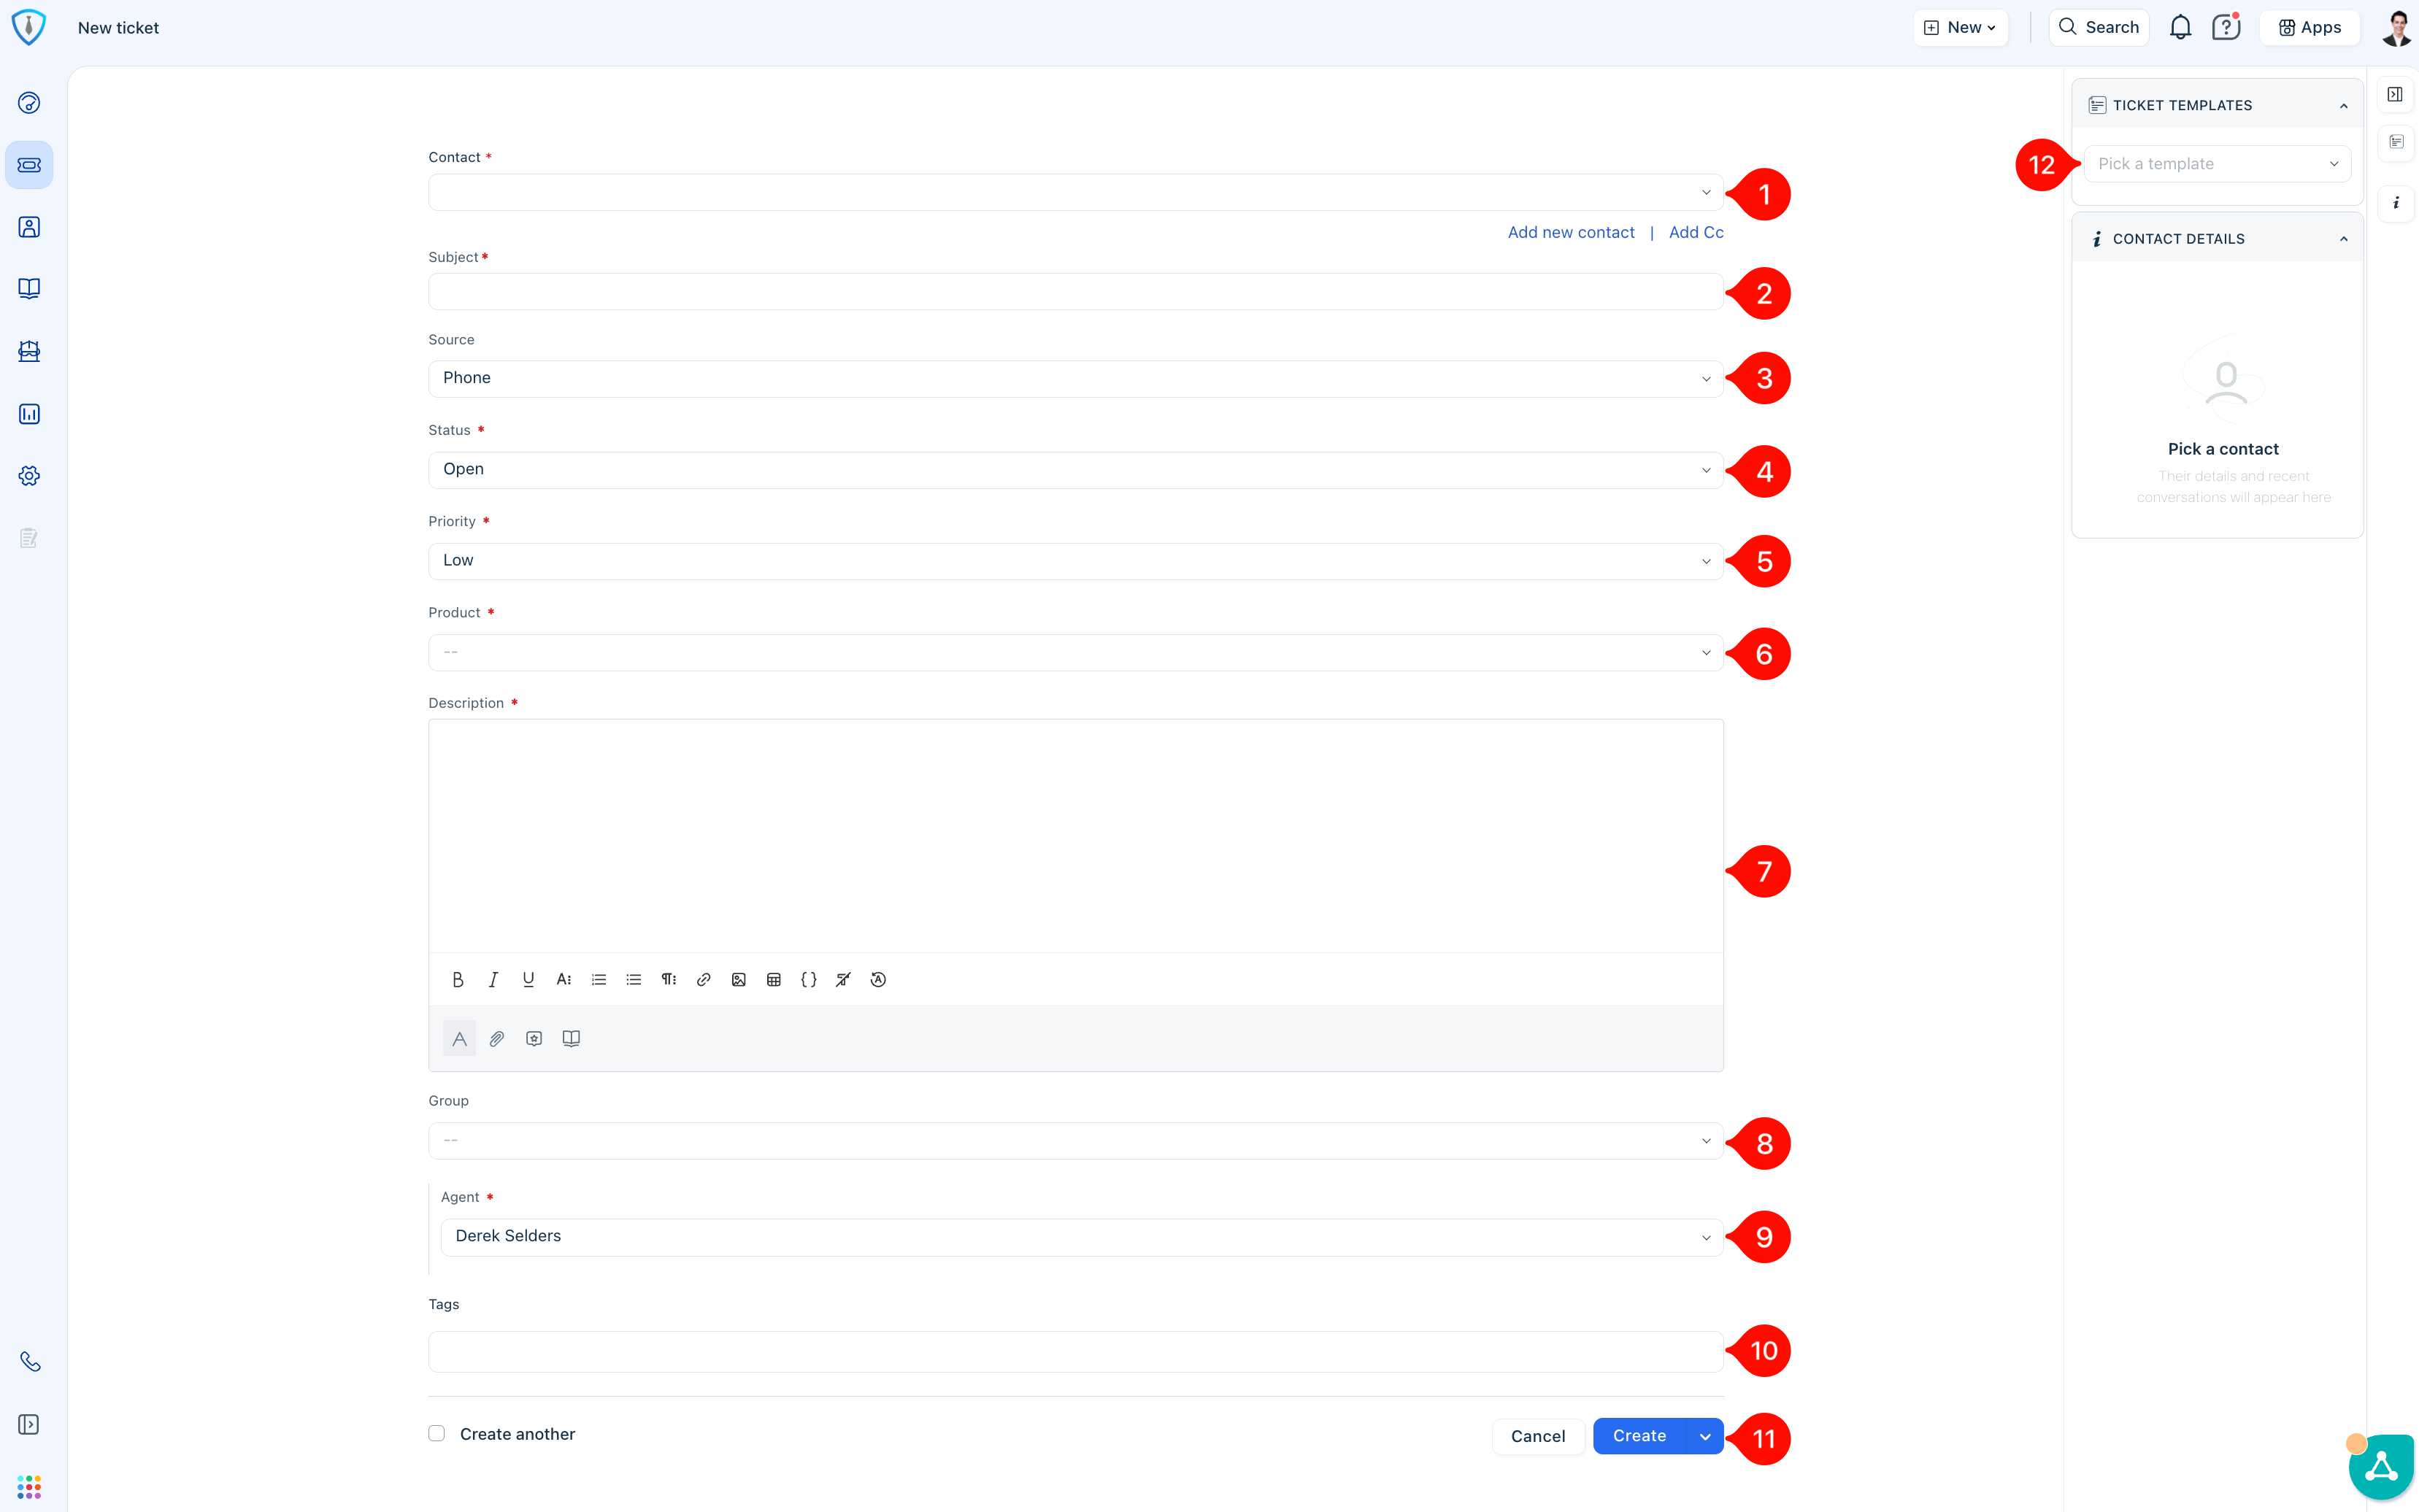
Figure 6: New Ticket Creation Form Fields
New Ticket Creation Fields and Options
- Contact: A contact must be selected to associate with the ticket. If the contact does not already exist, use the Add new contact option and enter as much information as possible.
- Subject: Provide a brief, clear description of the purpose of the ticket.
- Source: This can typically remain set to Phone by default.
- Status: This can remain set to Open unless another status is more appropriate based on the situation.
- Priority: Use your best judgment and internal guidelines to determine the appropriate priority level. This will be covered in more detail later in this guide (see Section 6).
- Product: Select the product that most closely aligns with the nature of the request.
- Description: Enter a concise summary of the issue. Note that customers can see this field when a ticket is manually created, so ensure the wording is professional, clear, and free of spelling or grammatical errors.
- Group: Select the internal team responsible for handling the ticket. In most cases, this will be Support.
- Agent: Assign the ticket to yourself or another agent as appropriate based on ownership and next steps.
- Tags: These are not commonly used and can typically be left blank unless otherwise instructed.
- Create: Click the blue button to submit and create the ticket.
- Ticket Templates: These are used in limited, specific scenarios and should only be selected when applicable.
Section 4: Ticket Lifecycle Overview
Before diving into specific actions within a ticket, it is important to understand the overall lifecycle. Once a ticket is created or submitted, it is routed to the appropriate internal agent or group for initial review and response. From there, the ticket progresses through various stages until it is fully resolved.
Understanding ownership and key ticket elements is essential when taking over or reviewing a ticket. The Show Activities (Item 1, Figure 7) section provides a complete history, including how the ticket was created, all status changes, documentation updates, and any automations that have been applied. This is often one of the first places you should review to quickly understand the context.
The system will automatically assign a First Response Due time (Item 2) based on the ticket’s priority level. It will also assign a Resolution Due date (Item 3), which is equally important. If circumstances change and the resolution timeline needs to be adjusted, this field must be updated accordingly. Any change to the resolution due date should always be accompanied by an internal note explaining the reason. This field is closely monitored, and exceeding the resolution due date will trigger notifications to operations and management, so it must be kept accurate and up to date.
The Properties section (Item 4) provides a high-level overview of the ticket, including key details such as status, priority, tags, and other important fields.
When you are ready to communicate with the customer, use the Reply function (Item 5) to send your response. For internal updates and documentation, use Add Note (Item 6), which serves as a critical tool for maintaining a clear and detailed record of all actions taken. These notes are internal by default and are essential when a ticket is escalated. Tickets that are escalated without sufficient documentation will typically be reassigned back for additional detail before further work can continue.
Proper documentation throughout the lifecycle of a ticket is critical and cannot be overstated. Detailed notes create a clear timeline of events, which supports consistent service delivery, assists in resolving disputes, and helps protect the company in situations involving liability. More detailed information on notes and documentation is covered in Section 8 of this guide.
Note: Maintaining strong documentation practices is also a key factor in overall performance expectations and assessments.
 Figure 7: Anatomy of a New Ticket
Section 5: Ticket Statuses
This is one of the most important sections of the guide, as proper use of ticket statuses directly impacts workflow, communication, and service level tracking. This section outlines each available status and when it should be applied.
Ticket statuses can be updated from multiple locations, most commonly within the Properties section of the ticket sidebar (Item 4 in Figure 7) or at the time of sending a reply (Item 1 in Figure 8 below). Each time a status is updated, you are expected to also review and update the ticket’s resolution due date and time as needed to ensure accurate SLA tracking and reporting.

Figure 8: Ticket Statuses
Pending
This is the most commonly used status after an initial reply. It indicates that we are waiting on additional information, clarification, or confirmation from the client. Once set to Pending, the system will automatically send reminder emails to the client at 24 and 48 hours. If no response is received after 72 business hours, the ticket will automatically move to Resolved.
Resolved Unbilled*
*This status is being phased out. Historically, it was used to apply a tag for later billing review.
Resolved
Use this when the request has been completed, the issue has been resolved, or no further progress can be made due to lack of response. After 24 hours in this status, the system will automatically update the ticket to Closed.
Work In Progress
This should only be used when you are actively working on the ticket but do not need additional communication from the client at that time. If a ticket remains in this status for 48 hours, it will automatically reopen to prevent it from being overlooked.
Scheduled
Use this status when a scheduling link has been sent to the client in your most recent reply.
Order in Progress
This status is used when an order has been placed, either by the client or on their behalf, and no further progress can be made until the order is fulfilled. If the ticket remains in this status for 7 days, it will automatically reopen and be reassigned to the Operations Manager for review.
Waiting on Third Party
Use this when progress depends on input or action from a third party rather than the client.
Extended Wait on Client
This should be used sparingly in situations where a higher-priority ticket is expected to require an extended response time from the client.
Waiting on Customer*
*This status is generally not preferred and is being phased out, as Pending should be used in most cases for client follow-up.
Schedule Confirmed
Use this when the client has confirmed or completed their booking and has an upcoming service appointment. These are typically scheduled within a short timeframe. A quality control automation will reopen and reassign the ticket after 10 days to ensure the status is still accurate.
Closed
Tickets should typically reach this status through automation rather than manual action. If you find yourself manually closing a ticket, it likely should be SHIFT-closed instead.
Shift-Close Special Note: Certain communications, such as spam or irrelevant inbound messages, can be closed without sending a response. To do this, hold the Shift key on your keyboard and click the Close button (Item 2, Figure 8).
Section 6: Ticket Priority Levels
Ticket priority levels are used to define urgency, guide response expectations, and ensure alignment with our service level commitments. Selecting the correct priority is critical to maintaining efficient operations and accurate reporting.
Low
Minor issue or request with little to no impact on business operations. These do not require immediate attention and can be addressed as time allows. The target is an initial response within 4 business hours, with a default resolution timeframe of 3 business days. Examples include non-critical software updates, new employee setup, employee off-boarding, simple lockouts, password resets, and MFA reset requests.
Medium
Standard service request or issue with moderate impact. Work can continue, but resolution is needed within a reasonable timeframe to prevent disruption. Requests submitted by a client principal should automatically be treated as Medium priority. The target is an initial response within 4 business hours and resolution within 1 business day. Examples include a non-functioning printer when alternatives are available, loss of mobile email access while desktop access remains, or VPN issues.
High
Significant issue impacting business operations, typically affecting one or more users’ ability to work or a critical function. These require prompt attention and prioritized handling. The target is an initial response within 2 business hours and resolution within the same business day. Examples include intermittent network connectivity affecting productivity or a complete email outage for a user or group.
Urgent (Critical)
Severe issue causing major business disruption, system-wide outage, security risk, or complete loss of functionality. These require immediate action and continuous effort until resolved. The target is an initial response within 1 hour and resolution within 4 business hours. Examples include a full network outage, critical system failure, or a completely unusable device with no workaround available.
When to Elevate a Ticket’s Priority
A ticket’s priority should be adjusted whenever new information indicates a greater level of impact than initially understood. This typically involves identifying how many users are affected, whether a core business function is disrupted, and whether any workarounds exist. You can use Figure 9 below as a reference to help determine which priority level most appropriately applies.
Importance of Proper Priority Assignment
It is important not to overuse High or Urgent priorities. Many tickets may initially be reported as critical by users, but should be validated against actual impact and SLA criteria before assigning priority. Proper classification ensures that truly critical issues receive the attention they require without diluting response effectiveness.
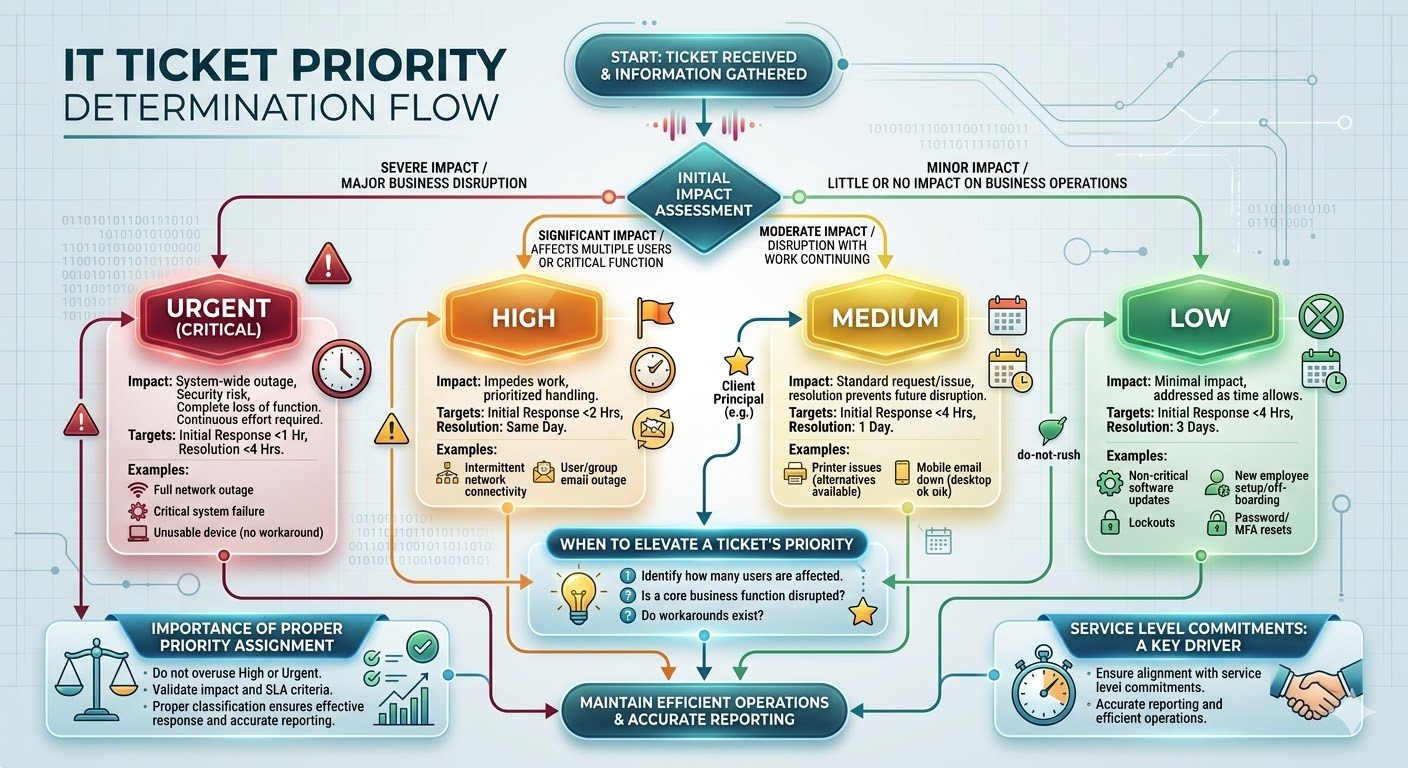
Figure 9: Flowchart To Help Determine a Ticket's Priority Level
Section 7: Notes & Documentation
Proper documentation is one of the most critical responsibilities when working a ticket. Notes serve as the official record of all actions taken, decisions made, and communication related to the issue. Any technician should be able to review a ticket and quickly understand its full history without needing additional context.
Internal notes should be added consistently throughout the lifecycle of a ticket. These notes should clearly explain what was done, why it was done, and what the next steps are. This is especially important when handing off a ticket, escalating to another team, or revisiting the issue at a later time.
Note: If another technician cannot pick up your ticket and continue working on it without asking questions, the documentation is not sufficient.
It is important to understand the distinction between internal notes and customer-facing communication. Internal (private) notes are only visible to other agents and should be used for technical details, troubleshooting steps, observations, and context that may not be appropriate or necessary for the customer. Customer replies should remain clear, concise, and professional. While a public notes feature exists, it is used in specific scenarios and integrations, such as text messaging, and will be covered in the Intermediate/Advanced guide.
Summary notes should be added at the conclusion of a ticket to provide a clear, concise overview of the issue and its resolution. This supports reporting, future reference, and identifying patterns across similar tickets. An AI-generated summary option is available and can be used to quickly complete this step.
Unlike standard notes, summary notes are not part of the chronological ticket timeline and will always remain pinned at the top of the thread for easy visibility (Item 3, Figure 10). To create one, click into the Add summary field (Item 1, Figure 10), allow the summary to generate, then click save. The completed summary will then appear at the top of the ticket (Item 2, Figure 10).
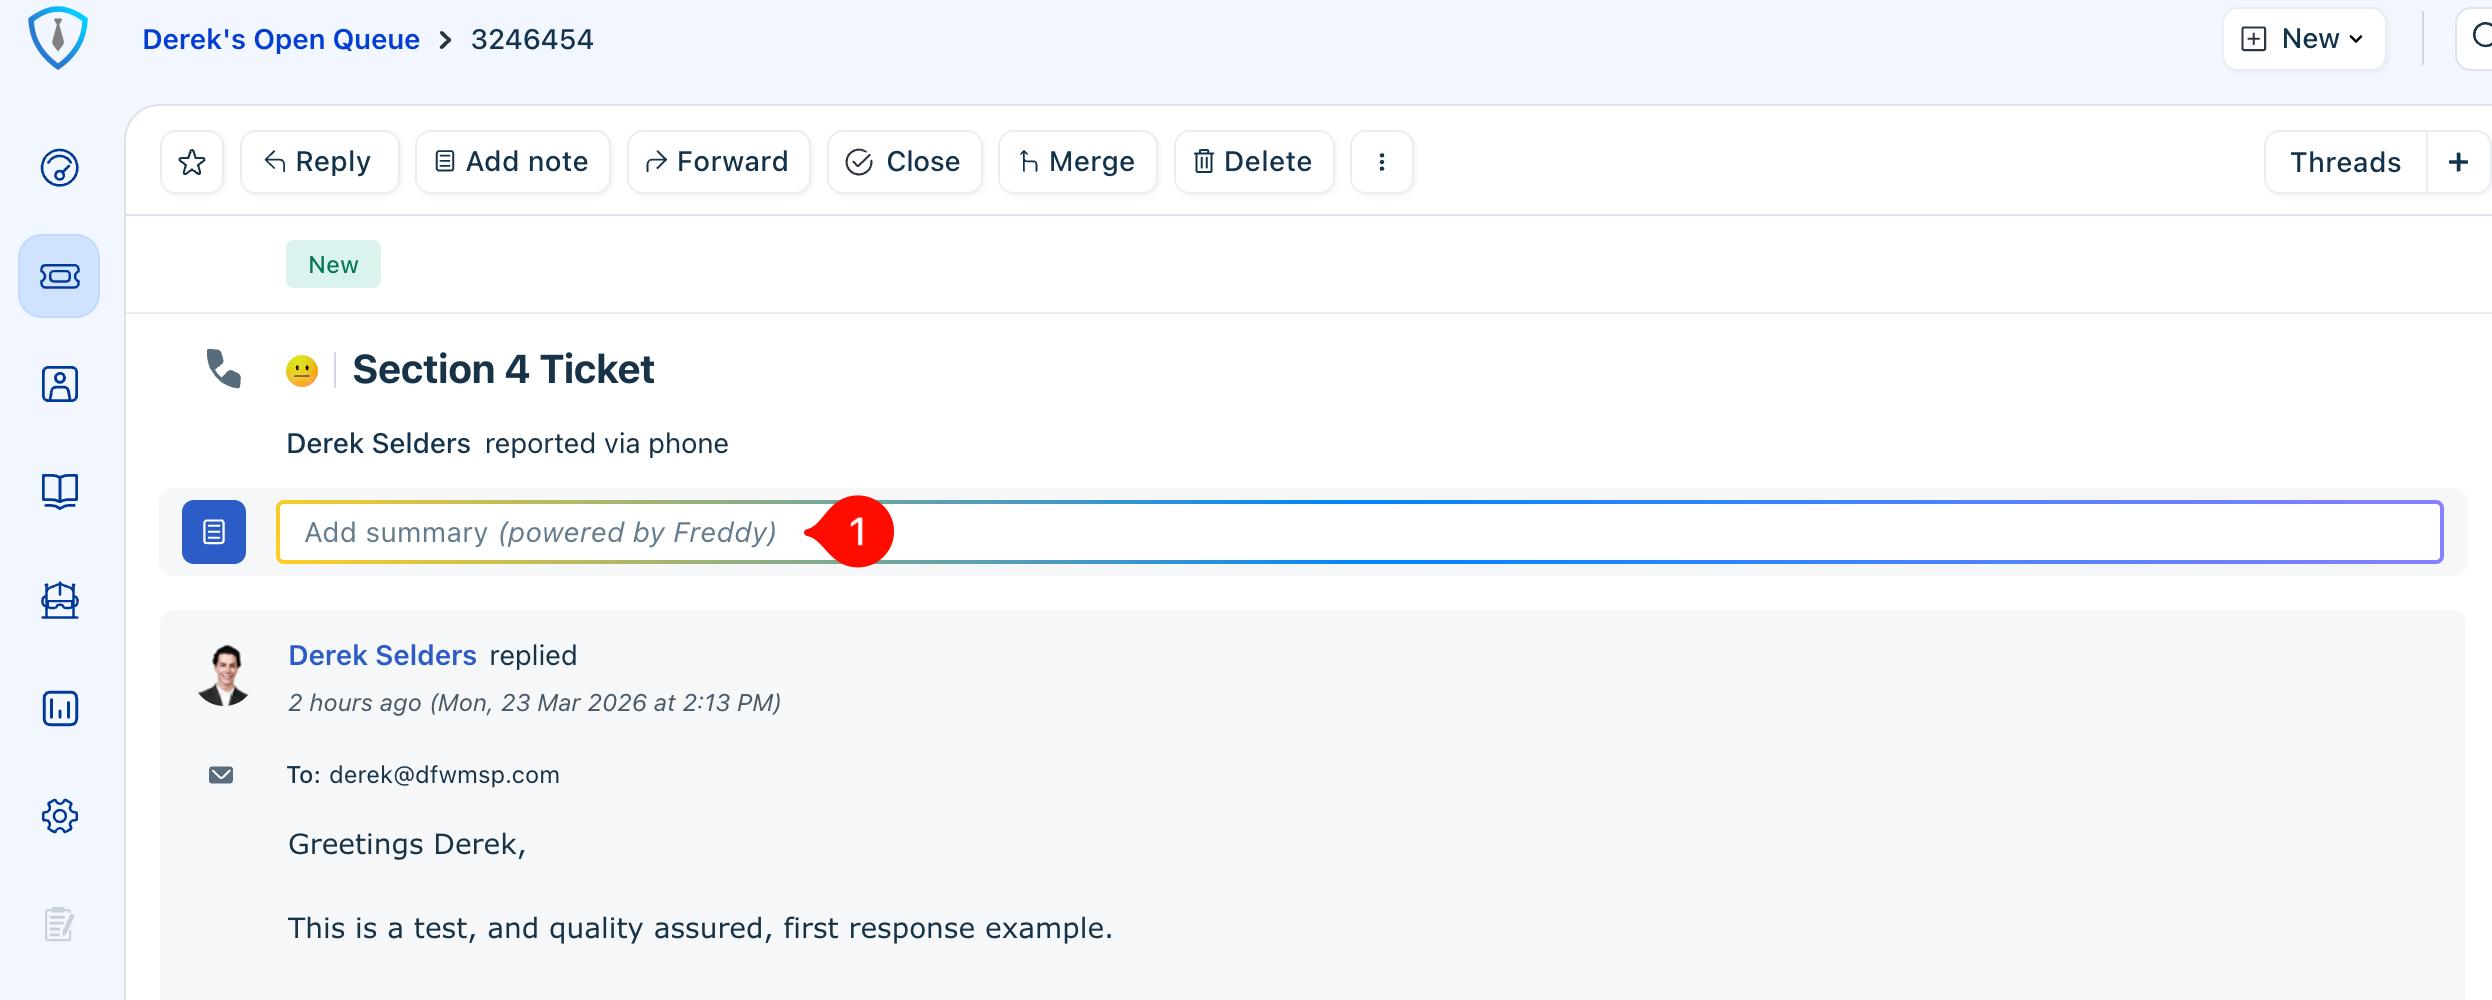
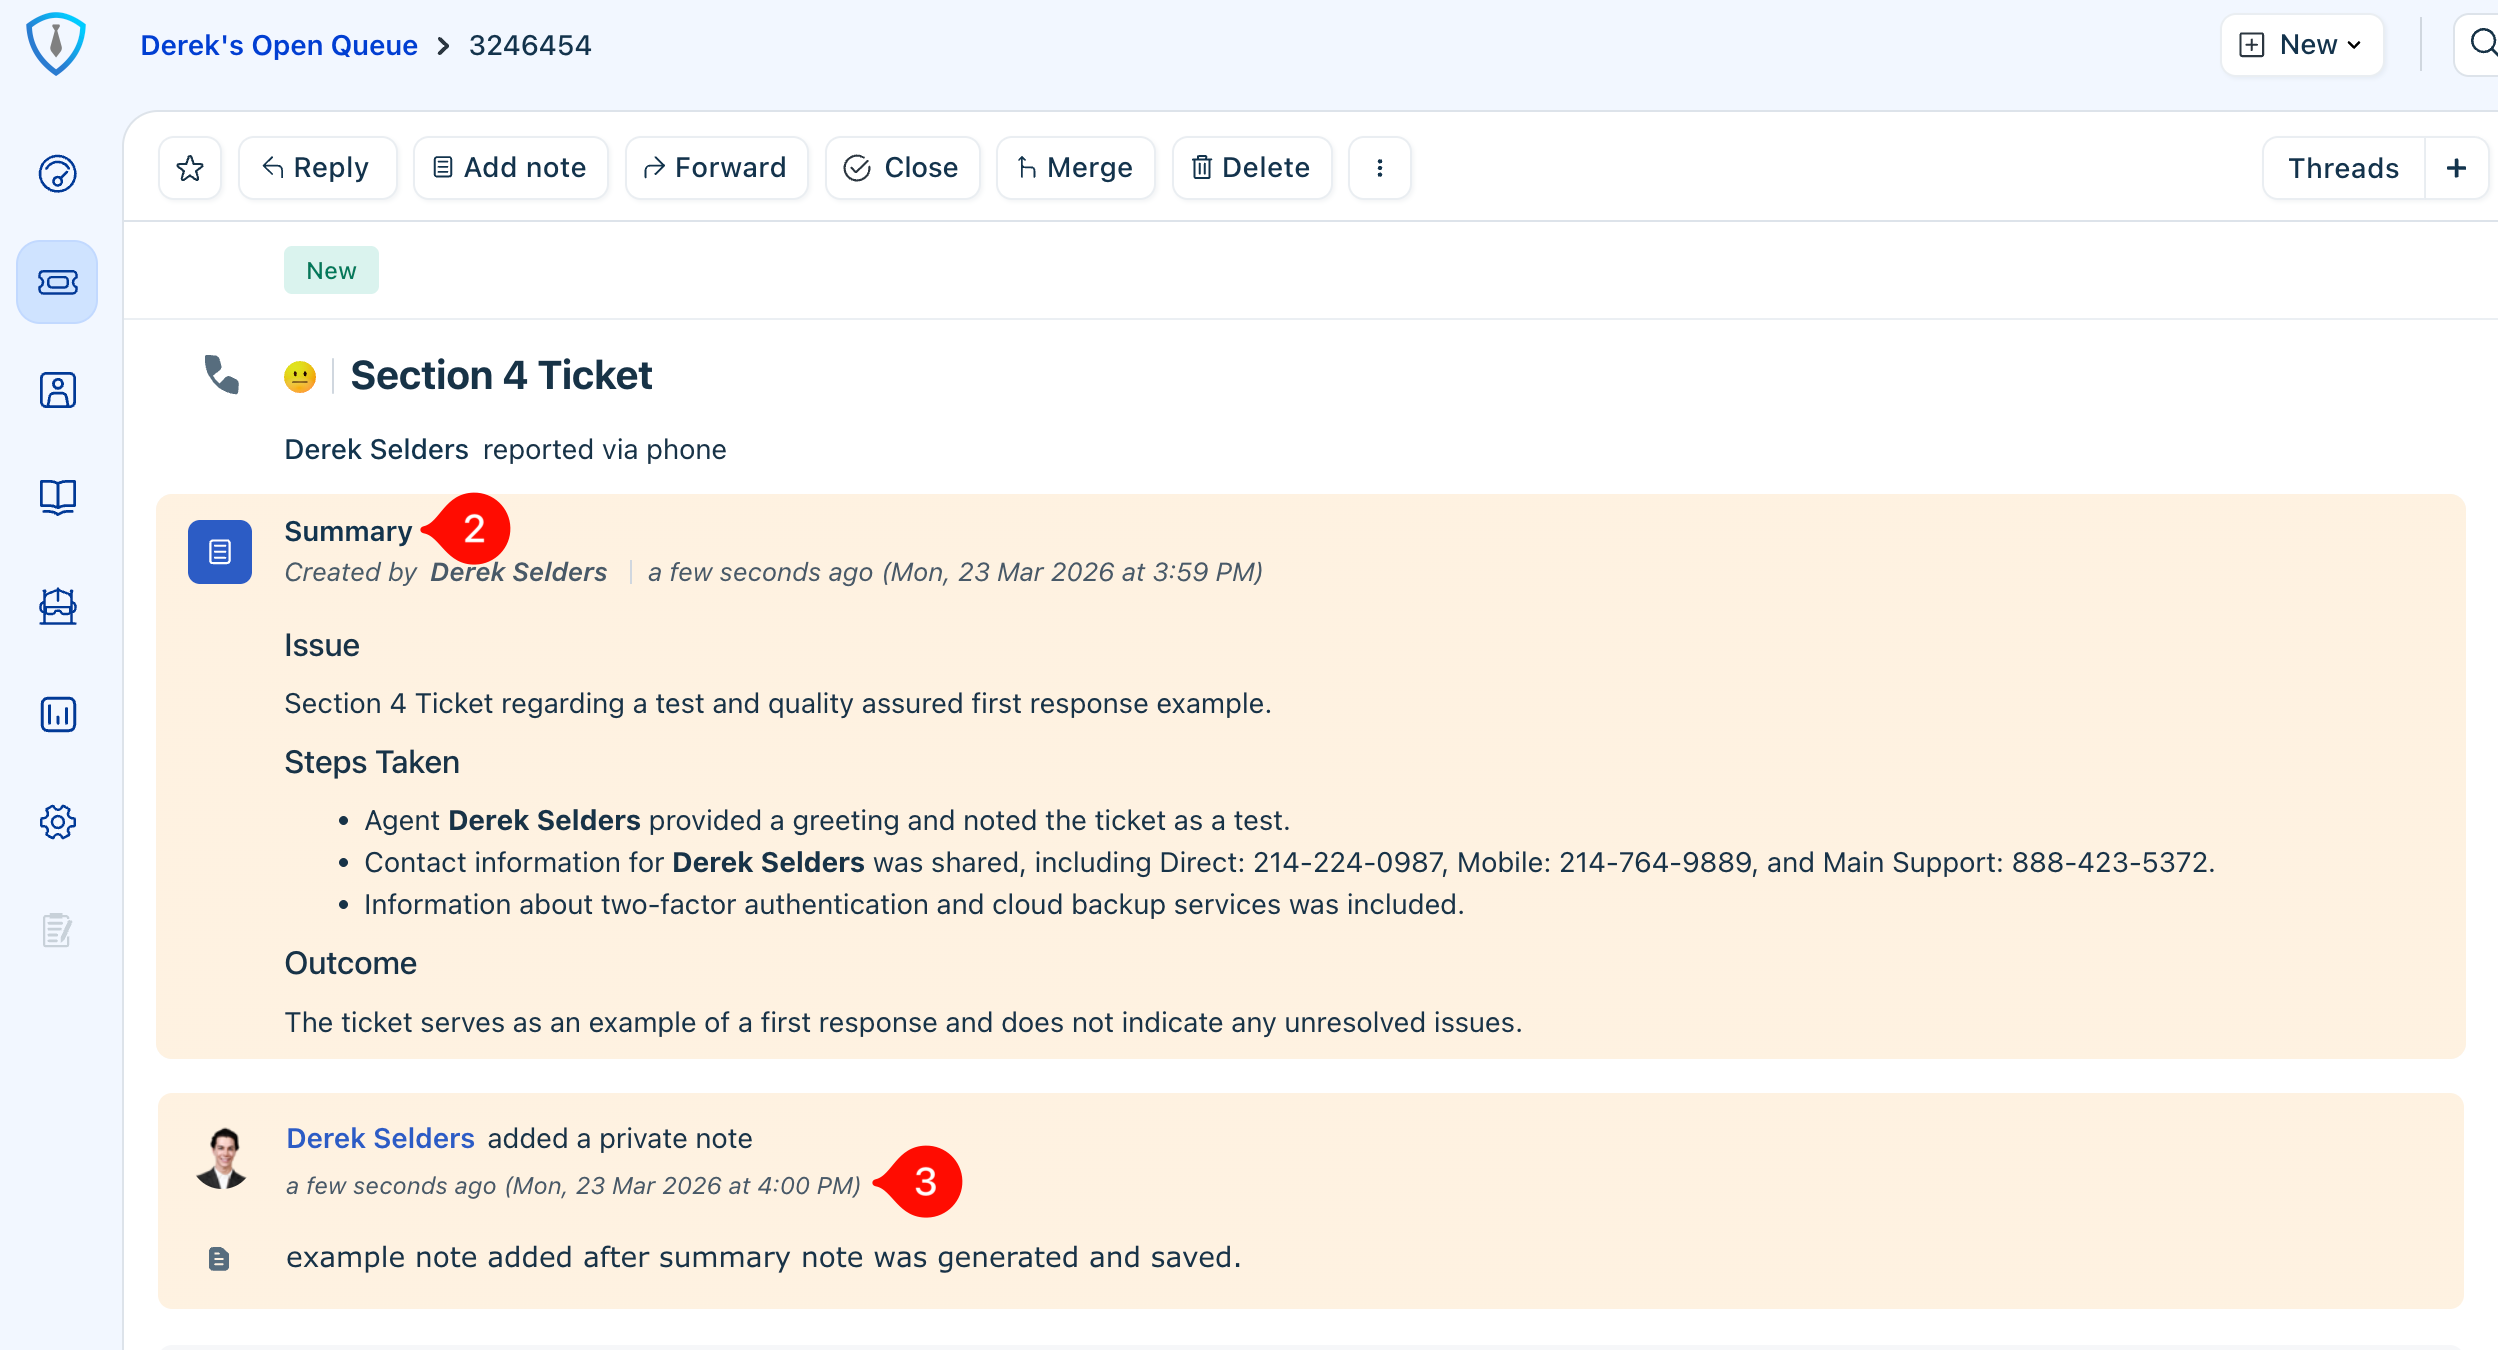
Figure 10: Summary Note Features
Consistent and thorough documentation ensures continuity across the team, supports accurate reporting and billing, and helps protect the organization in the event of disputes or audits.
Example of a "good vs bad note"
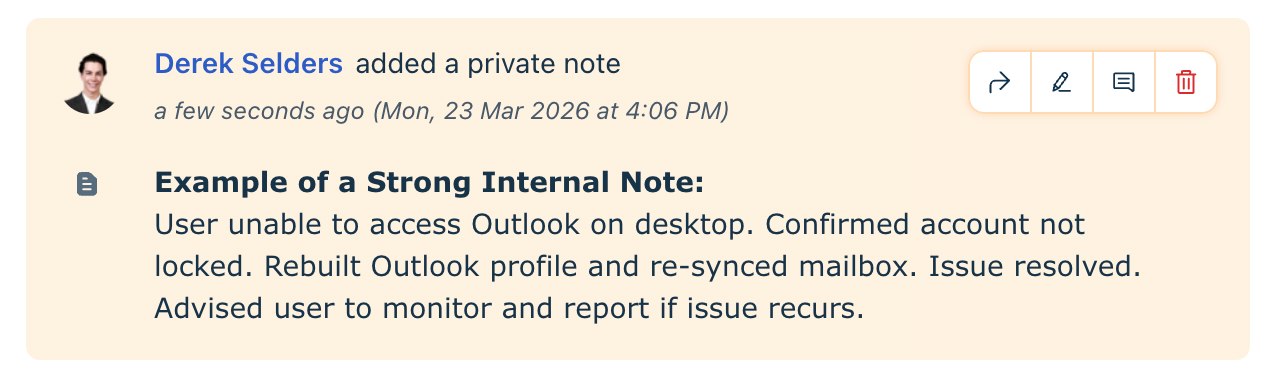
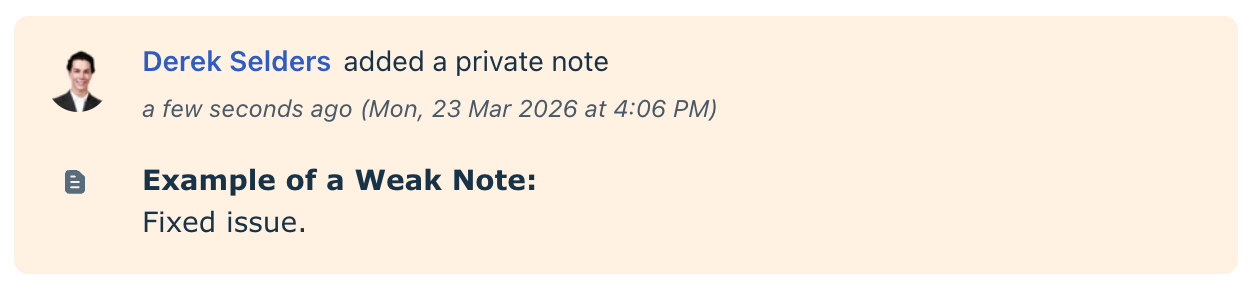
In some cases, ticket merging, linking, or establishing parent-child relationships may be necessary to maintain a complete and organized record of activity. These concepts will be covered in more detail in the Intermediate/Advanced guide.
Section 8: Best Practices for Daily Workflow
This section provides general expectations to help you stay organized and effective throughout the day.
Keeping tickets updated in real time is critical. If you are actively working on a task for a client, you should pause at least once every hour to review your ticket queue for any updates, new assignments, or high-priority items that may require immediate attention. This is a fast-paced, multitasking environment where multiple systems and tickets require consistent monitoring.
Avoiding stale or unassigned tickets is equally important. All tickets should be automatically assigned upon creation, so if you come across an unassigned ticket, it should be treated as an exception. In these cases, notify a manager so the issue can be investigated and corrected to prevent recurrence.
Communication standards are a key part of service delivery. All client-facing responses should be professional, clear, and grammatically correct, with minimal to no typos or formatting issues. As a baseline expectation, reply drafts should be reviewed using AI tools for proofreading and clarity to ensure consistent, high-quality communication.
The Freshdesk and Freshcaller mobile apps are available and recommended for download, as they provide convenient access to the ticketing system while away from your desk. While most core functionality is available, the mobile experience is more limited in terms of navigation and visibility compared to the desktop version.
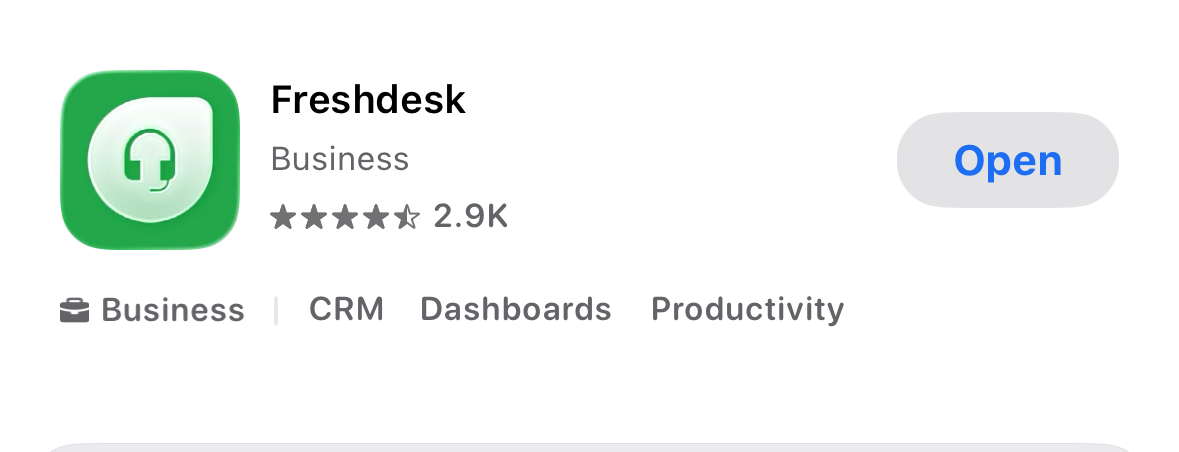
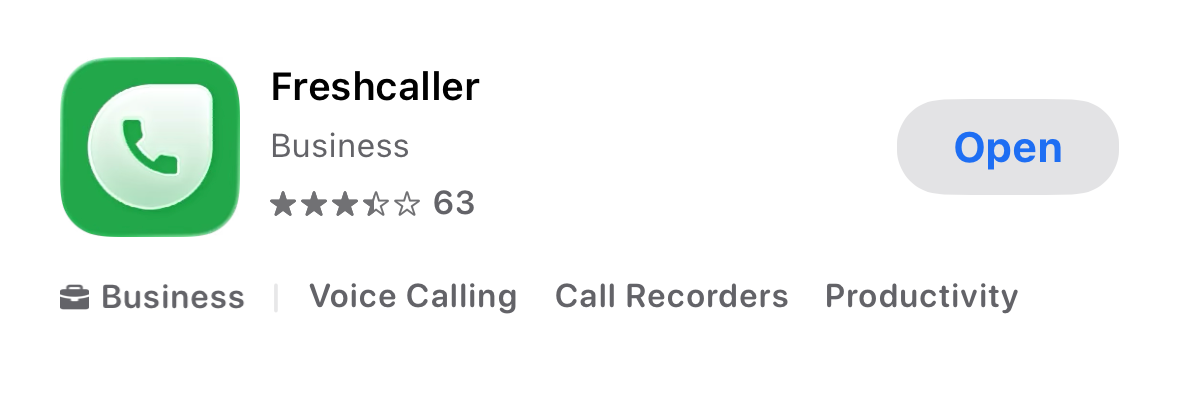
The mobile app is best used for quick actions such as reviewing and responding to updates, monitoring ticket activity, handling urgent or high-priority issues, and staying informed while out of the office or between tasks. For more complex work, detailed troubleshooting, or full queue management, the desktop version should be used whenever possible.
That’s all for this guide. Take your time getting familiar with the system, and don’t hesitate to ask questions as you go. Happy troubleshooting!
Was this article helpful?
That’s Great!
Thank you for your feedback
Sorry! We couldn't be helpful
Thank you for your feedback
Feedback sent
We appreciate your effort and will try to fix the article